
Running a WooCommerce store? Then you know how important it is to keep your product catalog clean, updated, and organized. But doing it all manually, especially with a large inventory, can be time-consuming and error-prone.
That’s where import-export plugins come in handy.
In this article, we’ll show you how to use WebToffee’s free Product Import Export plugin to quickly transfer products in and out of your WooCommerce store—saving you time and cutting down on mistakes.
You might also like:
How to Export WooCommerce Products
With the free Product Import Export for WooCommerce plugin, you can easily export your store’s products into a CSV file.
Here’s a simple step-by-step guide to help you export WooCommerce products using this plugin.
Step 1: Install WebToffee Product Import Export Plugin
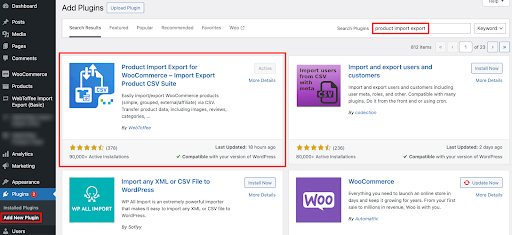
The first step in exporting WooCommerce products using the plugin is to install and activate the plugin. Product Import and Export for WooCommerce is a free and easy-to-use plugin available in the WordPress plugin directory.
For this, log in to your WordPress dashboard and navigate to:
- Plugins > Add New Plugin.
- Search for the “Product Import Export for WooCommerce” plugin.
- Then, Install and Activate the plugin.
 Step 2: Choose Product as Post Type
Once the plugin is installed,
- Go to WebToffee Import Export (Basic) > Export.
- Choose the post type to export as Product.
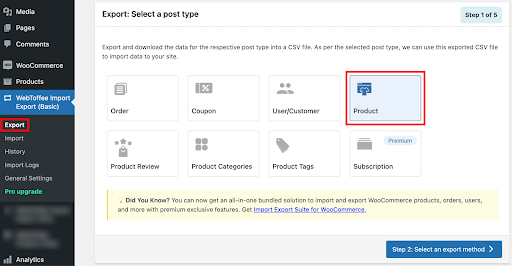 Click the Select an export method button to proceed to the next step.
Step 3: Select an Export Method
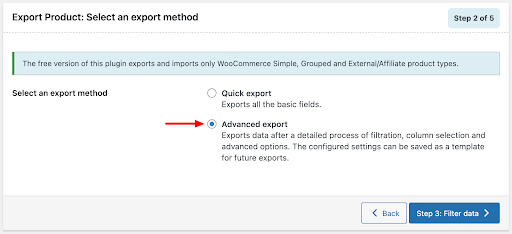
There are two ways to export products: Quick Export and Advanced Export.
The Quick Export feature lets you export all products with essential fields in just one click—fast and hassle-free.
For more control, use Advanced Export. It lets you filter products, select specific fields, and customize settings to create an export file tailored to your needs.
- Let’s choose Advanced export.
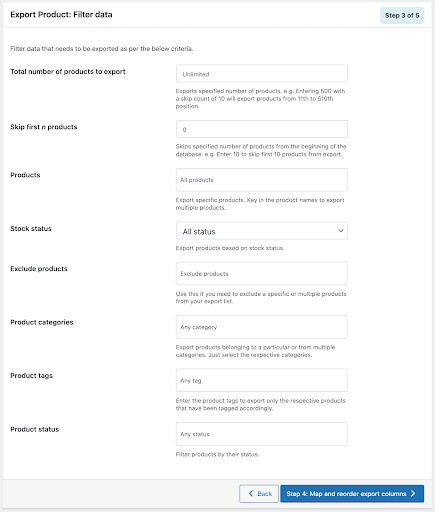
 Step 4: Filter Export Data
At this stage, you can apply filters to fine-tune your export—limit the number of products, skip initial entries, or export items based on specific categories and tags.
After configuring your selections, proceed to the next step.
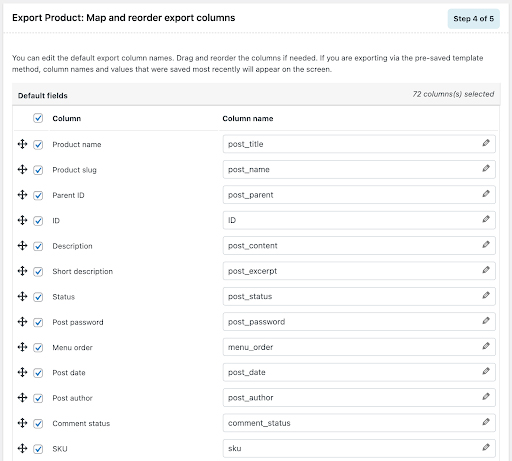
 Step 5: Map & Reorder Columns
Here,
- Choose which product data columns you want to export.
- Specify the names of these columns in the CSV file.
- Rearrange the column positions using the drag-and-drop icons.
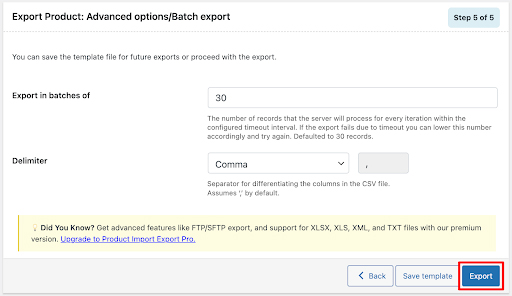
 Step 6: Export Products
This is the final step in exporting your WooCommerce products. Here,
- Select a batch size. It defines how many records the server processes per iteration within the timeout period. This controls the number of products exported at once.
- Then, choose a delimiter from the dropdown to separate columns in the CSV file.
- Click Export to proceed.
 When you export, a CSV file will be downloaded to your system. It will contain all the columns and products that satisfy the selected criteria.
Try Product Import Export WooCommerce Plugin Now
How to Import WooCommerce Products
You can use the same plugin to import your products back to the same or another store.
Note that your input CSV file should be encoded in UTF-8 format for flawless and accurate import of your products.
Follow the steps below to import products to WooCommerce using the free WooCommerce product import export plugin.
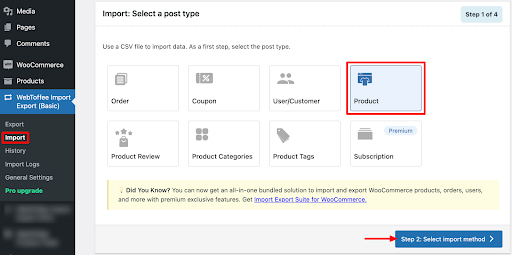
Step 1: Select Products As the Post Type to Import
From your WordPress dashboard,
- Go to – WebToffee Import Export (Basic) > Import.
- Select Product as the post type.
- Click Select import method.
 Step 2: Choose Import Method
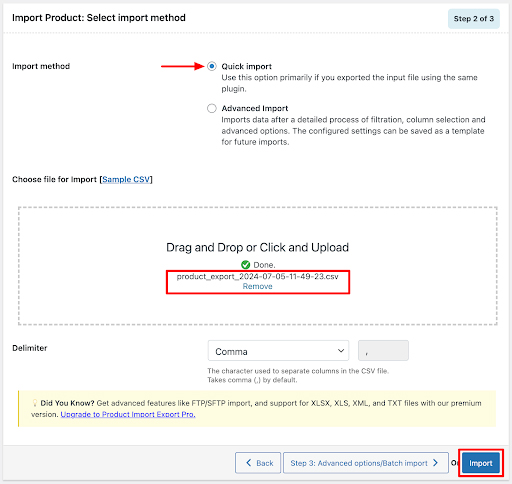
Next, choose your preferred import method: Quick Import or Advanced Import.
If you previously exported the file using the same plugin, Quick Import is the easiest option. Simply upload the file and click Import to transfer your WooCommerce products seamlessly.
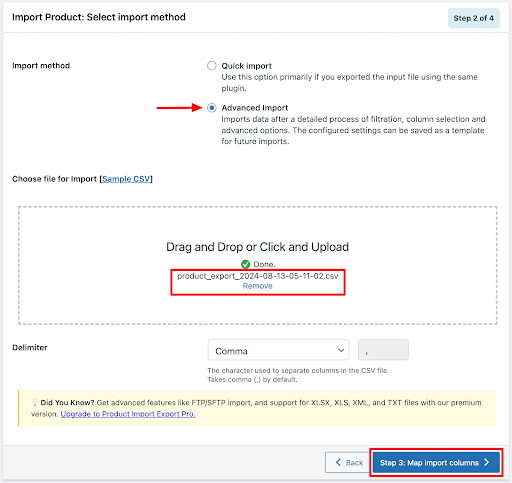
 Let’s see how the Advanced import method works, which has advanced options for more control over the import process.
- Upload the input CSV file.
- Select a delimiter to separate columns in the CSV file from the drop-down.
- Click the Map import columns button to proceed.
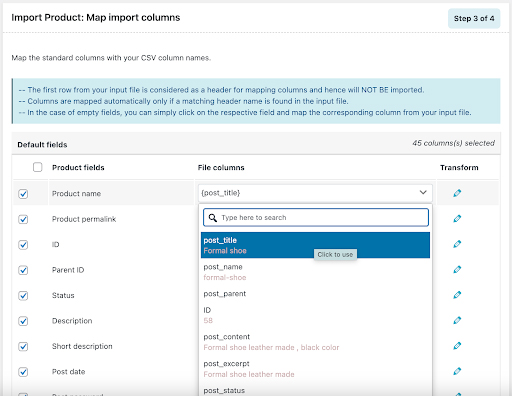
 Step 3: Reorder Columns of Products CSV File
Next, map the column headers from your CSV file to the corresponding WooCommerce product fields.
If the plugin recognizes matching headers, it will auto-map them for you. For unmatched or custom fields, you can easily adjust the mappings by:
- Manually selecting the correct WooCommerce field for each column
- Skipping fields you don’t want to import
- Saving your mapping for future imports
- Once done, click on Advanced options/Batch import.
 Proceed to the next step.
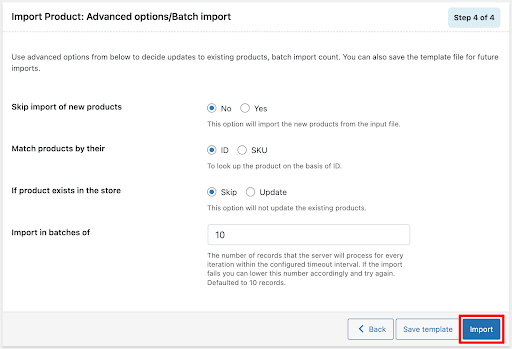
Step 4: Configure Advanced Import Options
Next, there are several advanced options for deciding the course of the import.
- Choose whether to skip or proceed with the import of new products.
- Select ID or SKU to match products.
- Skip or Update the existing products in your store.
- Set the number of products to import in a single batch.
Once done, click Import to import your WooCommerce products from a CSV file.
 Once the import is complete, a pop-up will display the import status, showing the number of successful imports and any errors encountered.
Upgrading to the premium version of the Product Import Export plugin unlocks advanced features, offering greater flexibility and control over your product data management compared to the free version.
- Broad Product Type Support: Handles simple, variable, grouped, external, subscription, and custom product types.
- Multiple File Format Compatibility: Supports import and export in CSV, XML, TSV, and Excel formats.
- Custom & Metadata Handling: Enables transfer of custom fields, third-party plugin data, and hidden metadata.
- Advanced Export Filters: Allows selective product export using powerful filtering options.
- Field Mapping & Data Transformation: Offers mapping and transformation tools for bulk edits during import.
- FTP/SFTP Transfers: Supports file transfers via FTP or SFTP protocols.
- Scheduled Automation: Allows scheduling of recurring import and export tasks.
Conclusion
Migrating to a new platform can feel overwhelming, especially when managing an extensive product catalog. That’s where the Product Import Export Plugin for WooCommerce comes in, making it easy to transfer your products quickly and accurately.
And it doesn’t stop there. WebToffee offers a suite of powerful tools, including the WooCommerce Order Import Export and WordPress Users Import Export plugins, so that you can move orders and user data with the same ease.
We hope this guide helped simplify the import-export process for your WooCommerce store. Got questions or thoughts to share? Drop a comment below. We’d love to hear from you!
Try Product Import Export WooCommerce Plugin Now